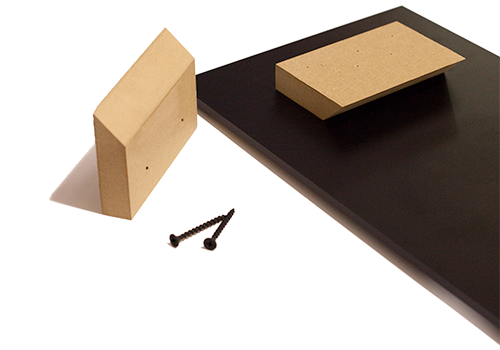
Float PhotoPlaqs give dimension to images as it appears to be “floating” off of the wall. Artwork is mounted on an acid-free 3/8” thick surface, finished with a beveled edge, and given a 3/4” deep backing to create a floating effect. The backing is recessed from the edge so that it is not easily seen. A simple French cleat system is provided to securely mount and display.
What is a PhotoPlaq?
A new and modern take on wall décor, PhotoPlaqs are made from premium eco-friendly, high-density fiber wood. The print is first laminated, and then adhered directly to an acid-free face of the wood. The edge is then beveled with your selected laminate color choice, and finally encapsulated on the back with a black laminate to provide a barrier against the elements. Each PhotoPlaq comes complete with a hanging system unique to each Plaq type.
What is the difference between a Standard, Float, Thick and Thin Plaq?
PhotoPlaqs differ based on the thickness and/or hanging system of each Plaq type:
Thin: 1/8” thick, no hanging system
Standard: 3/8” thick, keyhole hanging system
Float: 3/8” thick, French cleat hanging system
Thick:1” thick, French cleat hanging system
What laminate options are available?
How do I hang my PhotoPlaq?
Each PhotoPlaq comes with a hanging system unique to the Plaq type.
Keyhole Hanger:The Standard PhotoPlaq includes keyhole slots and screws for easy hanging. First, measure the area that you will be installing the presentation. While using a level, next place the screws (or if included, place the screw guides) in the keyhole slots and lightly make a dimple on the wall as to where the screws will go. Be sure to hold the Plaq and the screws (or screw guides) firmly so that they do not slip out of your hand. Drill the screws into the wall where the dimple imprints were just made, being sure to leave roughly 1/8” to 1/4″ between the wall and the base of the screw’s head. Finally, set the Plaq into position by placing the screws into the keyhole slot and sliding the artwork sideways until it hangs securely. Reposition or reinstall as needed.
French Cleat Hanger:Both the Float and Thick PhotoPlaq include a French Cleat hanging system and screws for quick and effortless hanging. First, measure the area that you will be installing the presentation. While using a level, place the wood hanger on the wall. Insert and tighten the screws so that the wood hanger remains snug on the wall. Once completed, simply place the Plaq onto the wood hanger so that it “locks” into place. Reposition or reinstall as needed.
Although the above methods are suggested for hanging the final PhotoPlaq presentation, we are not responsible for any damage, injury or problems that may occur, both direct and/or indirect as a consequence of installation.


