An alternative to traditional paper photo prints, images are printed directly to an aluminum panel through a dye-sublimated process. Available with a silver or white base receiving layer, Metal Prints feature an advanced, highly durable and extremely smooth photo surface that is glossy and scratch resistant. Although Metal Prints do produce high quality images with vivid color reproduction, the color and contrast is not as consistent or accurate to traditional forms of printing due to the lack of controllability in dye sublimation printing.
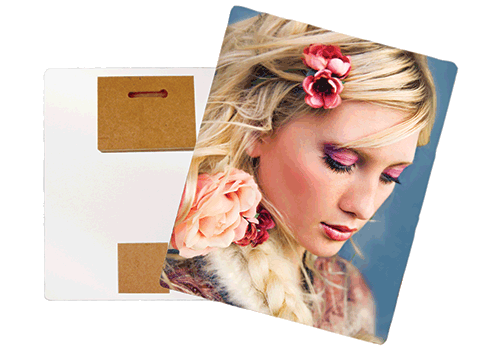
The white gloss base offers crisp bright whites and excellent color reproduction. Coated with a gloss finish, each metal print includes rounded corners and a keyhole hanger for easy installation.
What is a Metal Print?
An alternative to traditional paper photo prints, the image is printed directly to a .045” aluminum panel through a dye infused sublimated process. Available with a silver or white base receiving layer, Metal Prints feature an advanced, highly durable and extremely smooth photo surface that is glossy and more resistant to scratching.
What is the difference between a sliver and white base?
The silver base creates a metallic look to your photo or image, while the white gloss base offers crisp bright whites and excellent color reproduction.
What coating finishes are available?
Metal Prints include either a Glossy or Matte finish. The glossy surface provides a sharp, vibrant and shiny finish, while the matte creates a softer satin tone that is smooth and silky feeling.
How do I hang my Metal Print?
Each Metal Print comes with a wood keyhole hanger. First, measure the area that you will be installing the presentation. While using a level, next place the screws (or if included, place the screw guides) in the keyhole slots and lightly make a dimple on the wall as to where the screws will go. Be sure to hold the Metal Print and the screws (or screw guides) firmly so that they do not slip out of your hand. Drill the screws into the wall where the dimple imprints were just made, being sure to leave roughly 1/8” to 1/4″ between the wall and the base of the screw’s head. Finally, set the presentation into position by placing the screws into the keyhole slot and sliding the artwork sideways until it hangs securely. Reposition or reinstall as needed.
Although the above methods are suggested for hanging the final PhotoPlaq presentation, we are not responsible for any damage, injury or problems that may occur, both direct and/or indirect as a consequence of installation.
Our Brands